My cute niece had a Rockstar Birthday Party and it was one for the books! The kids came dressed up as rockstars and were given a "Backstage Pass." Then they spray colored their hair, decorated guitars and had karaoke - super star style!
I designed the invitation, backstage pass, cake cone toppers, and party favor tags. It was such a fun theme to do! Kids these days have the funnest parties - thanks to smart moms who come up with these awesome ideas! ;)
The software I was using to give you guys my free printable downloads has changed their policy and basically made it so I can't share my files publicly like I used to! But I think I may have found a loop-hole around it!
Click on the links and it will take you to Dropbox. It asks you to sign in or create an account, but just click "no thanks and download anyways" and it should download right onto your computer. Let me know if it doesn't work! I have another printable I want to share for Easter. Stay tuned!
I'm pretty obsessed with this garland and how nicely it came together! Most garlands are a repeat of the same object, but because this whole party was PINK I wanted to added more elements so it wasn't so boring.
Different variations of strings helped make this come together and still look cohesive. Yes, they were all pink, but the varying textures and tones helped them stand out and become more interesting.
Gosh, it's been so long since I've done a tutorial! Here it goes!
Tools you will need:
different colors/textures of yarn (because yarn is cheap)
feathers
tulle
baker's twine
any other types of string you can find - I happened upon some pom-pom string
hot glue
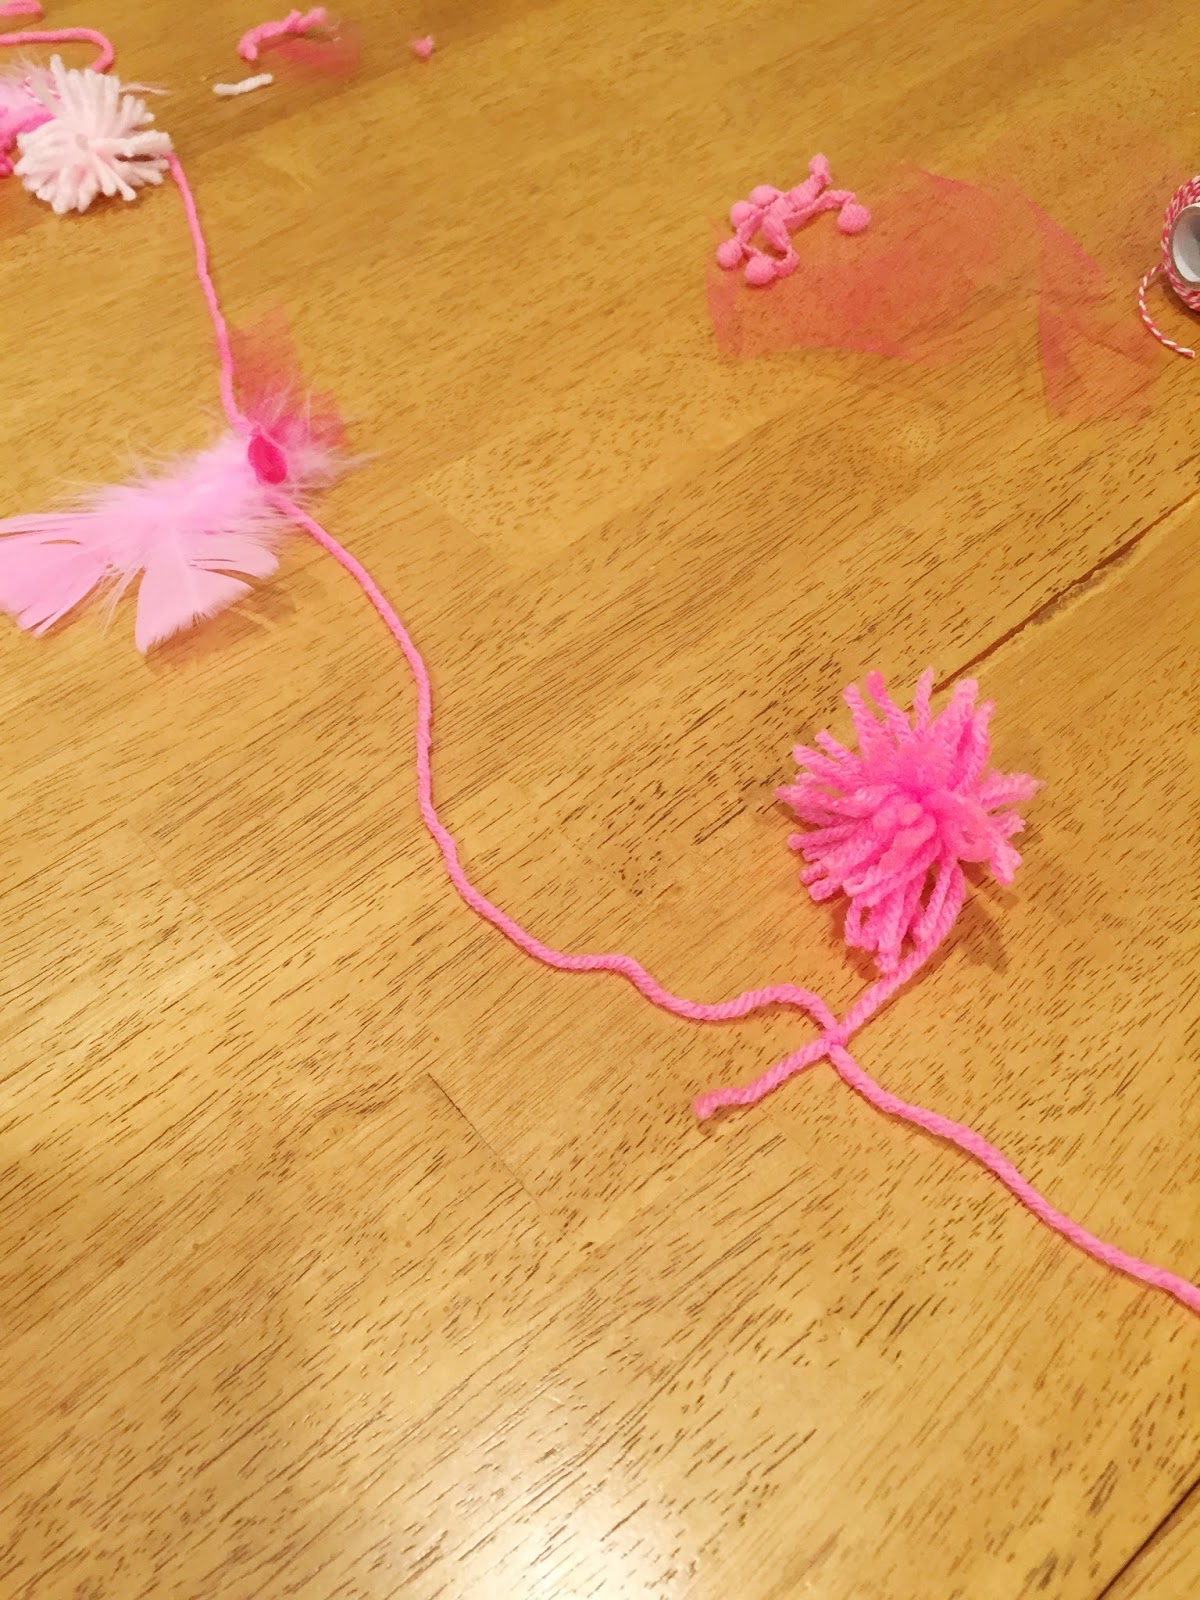
1. First, take your yarn and make it as long as you need it to be for the desired space you'll be decorating.
2. Glue feathers together into bunches of 2-3 per bunch. Wait until they dry completely.
3. Lay out your feather bunches on your piece of yarn so you know how far apart they need to be.
4. Make yarn pom-poms. This tutorial here can show you how to make a pom-pom. I used a plastic gift card to wrap my yarn around which made this small pom-pom size. Be sure not to trim off the excess yarn and keep it about 2-3 inches long. You will use this to tie it to the garland. Trim off any other excess if you want to keep them all the same length.
5. Gather your other supplies of various strings. Cut some pieces of tulle into rectangles which you can use to tie like pieces of string.
6. Lay out where you'll want your various strings and pom-poms by each feather bunch. They will all have their own little group.
7. Use a piece of string to tie the bunch of feathers onto the piece of yarn. If it's too hard, just glue the feathers on and tie the string around the feathers. Again, glue if you need to.
8. Tie the pom-poms onto the yarn next to the feathers. Tie additional pieces of strings next to pom-poms and feathers.
9. Repeat with each feather bunch and your garland is done!
My daughter turned 5! and she has wanted a flamingo birthday party for months! I really thought it would be one of those ideas she'd change her mind around and toss around other ideas, but she really stuck to her guns! So when January rolled around (I like to plan early...) and I asked her what she wanted and it was the same, I rolled with it. Flamingos are so trendy and fun right now, I couldn't be happier! I mean, she's 5! She should be wanting character parties! but I got lucky. This was so fun.
We had the party in our basement apartment in my in-laws home, who we currently live with while my husband is going to school. My daughter and I had planned simple games which didn't require much space so we could stay indoors and in our little living quarters. Because the games were so simple, the spotlight was on the snack table. How do you dress up a table background without spending a small fortune? The answer is balloons and yarn, my friends. I'm going to break the cost down to you so you can see how I'm able to decorate and throw a party on a budget!
I grabbed a few bags of pink balloons for $1 each and two different colors of pink regular yarn at $2.50 each. I blew up the balloons to different sizes to create variety and taped onto the wall with masking tape or painters tape. Then I used this tutorial from Crafts Unleashed for the yarn tassel garland. I did my own small twist to the tassels by using different twines to tie off the middle part. I feel it gives more variety to the monochromatic pink scheme. I bought a spool of hot pink bakers twine from Target for $3 and a pink pom-pom spool at Target also for $3.
I will post a tutorial on how to make the feather garland because it was of my own invention. ;)
I used a plastic table cloth ($1) for the backdrop and folded it in half so it wouldn't be transparent. Those plastic table cloths are pretty see-through! I taped it to the wall so it would hold and then I added the balloons, then the garlands, "Happy Birthday," palm leaves, and paper "lanterns." The Happy Birthday banner was from Target. It was in their dollar spot for $3 that I had previous bought for a different party. I bought just 1 bunch of palm leaves from Hobby Lobby. It was on sale for $16, which is pricy for me considering they're just fake leaves, but I'm so glad I got them because they seriously made the finishing touch! I cut each leaf from the bunch and taped them behind balloons to hide the tape. The paper lanterns were from Target in a pack of 5 for $5 that I already had.
Total money spent so far is: $30 (notice I didn't take into account the Happy Birthday banner and paper lanterns)
The party was in the afternoon after school, so I knew the kids would probably be hungry for snacks.
I planned simple snacks that were healthy and had variety in case kids didn't like some of them. The snack cups had mini pretzels, dried apple slices and pink mini marshmallows in them. And then I served Veggie Sticks ($3) and cheese sticks ($4). I wanted to serve a drink that was pretty well contained which was why I chose to do Gatorade bottles (2 packs of 12 for $12). Juice boxes would serve the same purpose as well. I designed and printed out the bottle wraps.
Food Total: $19
(I already had the pretzels, dried apple slices and marshmallows on-hand. It's great when you're able to use what you got!)
What I used to serve the food on were pink plates ($1), polka dot napkins, and pink straws ($1).
My daughter chose a strawberry cake ($1.50) and a vanilla frosting ($1.50). We already had the Legos and flamingo decorations. I got separate plates for the cake ($1) and forks ($1).
Total so far: $56
Now it's onto the party favors! These party favors cost more than I anticipated, but they turned out super cute so I'm not too upset over it. ;) I found these pink mini gift bags in the Target dollar spot (wow, aren't you surprised??!) where there were 6 for $3. I needed 12, so the bags were $6. This was where I wasn't anticipating spending so much on favor bags, but one of the games my daughter really wanted to play was the "Go Fish" game where you fish for prizes. I wanted the kids to be able to put their prizes into their favor bags so they wouldn't get lost. So we got the bags!
Inside the bags I had pink crinkle filler (which I made because I wanted to save money... and Target didn't have any in their dollar spot!) with two pieces of candy and a mini plastic flamingo figurine. I got a Valentine's candy mixed bag with 3 different types of candy on sale after Valentine's day (because it would've been pink! and cheaper) which was $2.50 and the mini flamingos were $0.59 cents each. I bought 20 and it was $17. I bought them online from The Big Zoo and had to pay a ridiculous amount of shipping... But it was the only place I could find that sold mini plastic flamingos in larger quantities! It's just crazy when the internet fails you, amiright???
On the outside of the favor bags I already had the pink feathers and the pink bakers twine was already mentioned. I designed the tags and printed them myself. I'm feeling like I should do a tutorial for these bags because the assembly of the feathers wasn't just a one step process.
Ok, so now our total is up to: $81.50
Now we move onto the flamingo centerpiece. What's a flamingo party without more flamingos?? I really wanted to get some of those plastic lawn flamingos, but this was friendlier on the budget. I found this tutorial from Frog Prince Paperie on how to make this flamingo. The glitter paper was $1 each for pink and black and the hot pink tissue paper was $1. I already had a small wooden rod and small flower pot I used for the base. The base was plastic and wasn't heavy enough to hold the flamingo up! So I taped it to a small can of pumpkin, covered it with palm leaves and all was good in the world.
This added to the total makes it: $84.50
The games the kids played were:
. Tissue paper art on a flamingo
. Duck Duck Flamingo
. Who Can Stand Like a Flamingo the Longest?
. Limbo
. Go Fish
All of the activities were essentially free except Go Fish. I bought a blue plastic tablecloth ($1) to cover a small up-turned table and decorated it with green crepe paper to make it look like sea weed. I totally forgot to take a picture of it, but it wasn't super grand. If it were the highlight of the party I would've given it more detail. The prizes they fished for were candy and stickers. The candy was from the giant Valentine's bag I previously mentioned and I bought 1 pack of stickers ($1) which I cut up into fair pieces. I didn't have a fishing pole, but I made one with supplies I already had on-hand: a wooden rod, twine, and a clothespin.
Total is up to: $86.50
Her party invitations were a hit! Everyone loved them and thought they were super cute. She loved them as well and it was actually the sole reason why she wanted a flamingo party! I already had the card stock and feathers, and I printed them myself. We didn't do envelopes.
The final party decorations are these pom-poms and tassel garlands I hung from the ceiling. The yarn was already mentioned and I got 2 different types of pink tulle ($2 each) to make the pom-poms out of. (Just Google it and there's a bazillion tutorials out there on how to make tulle pom-poms. I didn't need to add my version of it!) I hung them on the ceiling using masking tape because painter's tape would've been too distracting!
These two elements are so simple, yet, they really transformed the room into a magical party room! Every kid who stepped in had their eyes lit up from how fun they were. They do take time to make, but for someone on a budget, it was very pocket friendly.
Total so far: $90.50
I also had some crepe paper hung in the doorway and had made flamingo footprints leading all the way to our door! I did an Instastory of them, but totally forgot to take pictures!! The way to our basement door is kinda involved and I didn't want the kids getting lost in my in-law's giant garage, so all they needed to do was follow the footprints. PLUS I remember as a kid, most likely around this age of 5, where one of my friends had a puppy party and she had paw prints on her front walkway which led to her front door and I thought it was the greatest thing ever. I mean, it's been 20 years later and I still remember it! So, I dunno, maybe Avery's friends will remember following flamingo footprints 20 years later too.
I did need to buy extra orange paper for the footprints (I know, I should've done pink or black. What flamingo has orange feet??) so that cost me an extra $4 because I had to buy a huge pack of paper because I live in a small town with very limited options.
So here I will leave you with my grand party total: $94.50.
Some of you may think that's a lot and some of you may feel it's a steal! But I hope by breaking it down you were able to see what goes into a party like this. None of it was catered or I didn't rent out tables and chairs or a venue, but I also didn't just throw up crepe paper and call it good (which is totally fine if you do this!! You do you - it's about balance and I'm not about to mom-shame anyone who throws parties like that! ;). I just did what I felt was important and made it into a themed party.
Each party is different and has different needs, but I am confident I can plan a party for under $100. I've done it every time I've thrown a party except for the times I had an actual meal. (Real food requires more money, but it was still done as cheaply as possible.) I hope this served you as some quality party inspiration for your next birthday party and if you need an extra hand, please don't hesitate to ask me! I would love to help you plan your party and if you need a quote, just e-mail me and I'll be able to let you know what I can do for you!
In light of Dr. Seuss's birthday on Thursday, I thought I'd share a Dr. Seuss birthday party package I did for a client! All of the food was themed from the books and were very clever, but my favorite part was this cute little poem:
Dr. Seuss is one of those people who have given so much to the world and have made a difference for the greater good. I loved his books growing up and love them just as much reading them to my kids.
A month or so ago my daughter wanted to watch Horton Hears a Who, so after it was over I decided to watch the extras which are available on the DVD. There was a small clip of Dr. Seuss's life and how people had always thought his ideas were crazy and didn't think he'd ever get very far in life. His wife commented how he was always sketching odd things and would make up funny words. Little did she know how much his peculiar imagination would create an such an empire in Children's Literature. His books they truly are timeless and I'm so grateful for the people who believe in themselves and have the guts enough to block out everyone else and do what they love.
I really like having unique parties. I don't like doing what everyone else is doing and even though florals and geometric shapes are super trendy right now, this color combination isn't which is how I feel it's different!
I was once told if you do something different, at least one thing needs to be familiar so people actually "get it." The example was if you're going to do a space movie and everything is all space-y with different planets and lots of new things, you need to keep the people human. Or the opposite route would be to have aliens on planet Earth - the aliens are different, but planet Earth is familiar. Makes sense, right?
Ok, off my teaching box.
So I love this color combination and how this baby girl birthday party isn't just PINK. Now without further ado, I bring you my baby's first birthday party.
I always need to have a date guests need to RSVP by. People seem to respond better when there's a deadline! ;) And it gives me the time I need to have a general idea of how much food to plan.
Time capsule. Read further for details.
Why yes, this entire party was themed from her dress! Perfect inspiration!
This photo sums up my baby girl perfectly.
Baby's first piggy bank is a cute little touch for decor and it gives guests the option to drop a few bucks if they feel inclined to do so...
I made a time capsule and it was the best decision I have ever made. My husband saw that story, Letters from Heaven, which went viral about the girl who opened her time capsule when she turned 18 and she said it was the best birthday present ever, and he suggested we do it for our little girl too.
I wanted to create that same magical moment for my little one and asked the guests to bring a letter instead of gifts. Being the second girl, she already has everything she needs and the letters will be such a treasure when she's able to open them.
My floral letter "S" which turned out to look like the number "8" instead... (insert laughing/crying emoji here)
Party favors!
I had an array of ages with the guests who came, so I decided to do different favors. I found some really fun ice cream lip glosses I got for the girls, toy rocket launchers for the boys, and just candy for the adults.
Month by month photo banner, except with this one I decided to make a game out of it.
I mixed the photos and the guests had to guess the correct order. Whoever got the most correct won!
I strung the pictures with twine and made the tissue paper flowers from a tutorial I found at Design Every Day.
For the flower banner I got my inspiration from A Practical Wedding, but instead of real flowers I used fake flowers and added knots of twine and crazy-fun pom-pom string.
It made for a great center piece and everyone seemed to enjoy the little game! It was a lot harder than they all thought it would be.
Guess Baby's Age free printable can be found here.
I also had her Baby Book and Baby Calendar (for milestones) laid out in case anyone wanted to look at them. If I was really on top of my game I would've made a little video of her with the videos of her first year. I'm going to try and make one for her time capsule.
I had the party at 3:00pm because that was after her nap so she'd be happy and rested. But because it wasn't at a meal time I just served snacks.
String cheese is her favorite food so I had to have that.
I made these little snack cups mostly for the kids, but everyone ended up enjoying them! They had Chex, peanuts, pretzel sticks and colored marshmallows.
And then you can never go wrong with chips and guac.
I made a cake for the guests to enjoy and...
her own little smash cake because a one year old party isn't complete without a good cake smash!
Her time capsule box at the end of the party full of lots of lovely letters, party string, her hat and a dollar bill.
Here's the explanation for the dollar bill: another activity I love to do is this Korean tradition they do for their babies. I don't know what it's called, but you lay out 4 objects (paint brush = creativity, book = intelligence, string = long life, money = wealth) and whichever one the baby chooses will supposedly be what they become as an adult! And my baby chose the dollar bill. So it's just a fun little tradition and it will be fun to see if it comes true or not! (And it's also a great time filler because there's not a whole lot you can do for a one year old party!)
--
If you're looking for a custom party package please email me and we can get started! SaveSaveSaveSave
My purpose for having this blog is to inspire you for everyday life by adding more fun with my DIY tutorials or products from my Etsy shop. I like to keep things beautiful and easy.