Facebook Instagram Pinterest Shop

Designs by TiffanyCo

  • Home
  • Freebies
  • DIY Projects
  • Parties
    • Birthday
    • Baby Shower
  • Portfolio
  • Design Service Prices
  • Etsy Shop
  • About
  • Contact
A few days ago we celebrated our dog Harley's 2nd birthday! I know, she's just a dog, but any excuse to have a party and I'm on board! I made her some homemade dog treats using this recipe and fashioned them into a cake. She loved them so much! I highly recommend them! Any time she sees me with one, she does all of her tricks without me asking her to do them. Silly girl. 

We got Harley from the Humane Society two days before Christmas and they had pretty much no background history of her. I know, red flag right there, but we fell in love with her and she bonded with us. They guessed her breed and they guessed her age was around 1.5. So we were able to decide what day we wanted her birthday to be and we chose to do my husband's half birthday to make it more memorable! I think because it was around Christmas time when we got her there were more donations than usual so she came home with so much swag! Lots of toys, a blanket, and a few of these rope braid chew toys. I thought it was such a generous offering.

A few months later I decided making these rope braids would be a nice service activity and a great way to recycle old t-shirts. My family helped me and we were able to donate 61 rope braids! I should've counted how many t-shirts we ended up using. This project is great for anyone who knows how to braid, so I guess that would maybe be in the range of kids aged 8 and up??? I'm not sure when kids learn how to braid, but as long as they know how, they can do this. So this makes for an awesome family activity or a religious group, or really any type of group wanting to do some service! 

*Note: In this tutorial I'm showing how these can be made by using a cotton button up shirt. I do not recommend using this! Stick to t-shirts. They don't fray.
Tools you will need:
recycled t-shirts
cutting mat
rotary cutter
ruler
(or scissors)
1. Cut up strips from the t-shirt. I did my pieces 2 inches wide and all the way up the body part of the shirt. I didn't bother with the sleeves, but you can if you want.
2. Piece 3 similar lengthed pieces together. It's fun to mix and match different colors.
 3. Tie a knot at the end.
 4. Braid it.
 5. Finish it off with another knot. That's it!
Here's the stash my family and I made. All old, unwanted t-shirts. Nothing fancy because the dogs are just going to rip it up anyways. It took me probably 2-3 hours to cut up all of the strips and just a half hour to an hour for them to braid them all. 
So there you have it! An easy, environmentally friendly service activity. This would also be great for these summer days when it's too hot to play outside, but you want your kids to be productive and learn about service! BONUS: After you braid them all you can make it an outing and go to your local dog shelter and look at all the cute dogs! 
She has allergies which is why her eyes are all red. They're actually getting better if you can believe it! Poor girl.
Share
Tweet
Pin
Share
No comments
Did you know I do custom work? Well, I do!

This lovely bride-to-be asked me to customize my "Oh, My Darling Clementine" print to say "Clemens-tine" instead of "Clementine" because her new last name will be Clemens and this is a wedding gift for her man.

I was a little worried about making all of the additional letters fit, but it worked!
This wasn't my first custom project for this specific print. I've had others ask for names of their baby with their birth year added at the bottom. I love doing customizations because for a moment I feel a connection with others around me and I get be an instrument in making a memory for them.

If you want a customized print, you can request a custom order right on my Etsy shop! Or if you want to talk about it first, just shoot me an email. Both are just a click away on the site.
Share
Tweet
Pin
Share
No comments
A few years ago I did a TV segment on the local news station showcasing this DIY project and then they briefly mentioned my business. (Hey, it was 2 minutes long! A lot was crammed in there!)

It was my first time being on TV, it was something that took a lot of guts and was way out of my comfort zone! So afterwards I totally forgot to post this DIY because I was so relieved it was over!
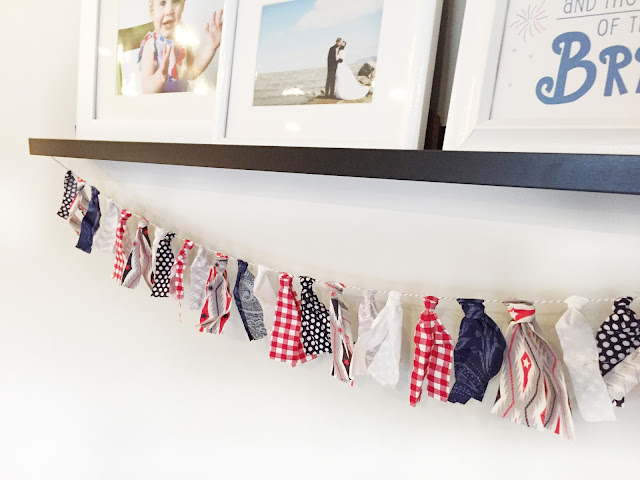
I love this garland because it's so easy. It's not super time consuming too. Just make it while you watch a movie or your favorite TV show!
I already made a tutorial for it here. I used these garlands to decorate my daughter's birthday party and they were so great on a budget.
There are two different kinds you can make. The first one that's showed above (Rag Garland) and the option shown below (Knot Garland). Both are equally easy, but I will say the Knot Garland uses more fabric if that's a concern.
 So go grab some red, white and blue fabric and make yourself some American decor!
Share
Tweet
Pin
Share
No comments
Newer Posts
Older Posts

Hi There

My purpose for having this blog is to inspire you for everyday life by adding more fun with my DIY tutorials or products from my Etsy shop. I like to keep things beautiful and easy.


Follow Along

  • Facebook
  • Instagram
  • Pinterest
  • Bloglovin'
  • Shop

recent posts

Sponsor

Blog Archive

  • ▼  2017 (27)
    • ►  November (2)
    • ►  October (3)
    • ►  September (2)
    • ►  August (1)
    • ►  July (1)
    • ▼  June (3)
      • DIY Dog Rope Braid Chew Toy Tutorial
      • Custom Clemens-tine Print
      • DIY Patriotic Decorative Garlands
    • ►  May (4)
    • ►  April (4)
    • ►  March (3)
    • ►  February (2)
    • ►  January (2)
  • ►  2016 (43)
    • ►  December (6)
    • ►  November (6)
    • ►  October (4)
    • ►  September (3)
    • ►  August (1)
    • ►  July (1)
    • ►  June (3)
    • ►  May (6)
    • ►  April (6)
    • ►  March (5)
    • ►  February (2)
  • ►  2015 (29)
    • ►  December (4)
    • ►  November (2)
    • ►  October (2)
    • ►  September (3)
    • ►  August (1)
    • ►  July (3)
    • ►  June (4)
    • ►  May (3)
    • ►  April (2)
    • ►  March (1)
    • ►  February (2)
    • ►  January (2)
  • ►  2014 (40)
    • ►  December (7)
    • ►  November (4)
    • ►  October (5)
    • ►  September (3)
    • ►  August (3)
    • ►  July (1)
    • ►  June (2)
    • ►  May (3)
    • ►  April (2)
    • ►  March (2)
    • ►  February (4)
    • ►  January (4)
  • ►  2013 (32)
    • ►  December (2)
    • ►  November (5)
    • ►  October (3)
    • ►  September (4)
    • ►  August (6)
    • ►  July (6)
    • ►  June (3)
    • ►  May (3)

Labels

  • DIY Tutorial
  • Holiday
  • Client Work
  • Freebie
  • Printable Download
  • Invitation Design
  • Realness
  • Birthday Party
  • My Products
  • Giveaway
  • Christmas Card
  • Craft Fair
  • Announcement
  • Gift
  • Baby Shower
  • Logo
  • VIDA Products

Search

Facebook Twitter Instagram Pinterest Bloglovin
FOLLOW ME @INSTAGRAM

Created with by BeautyTemplates